
It all starts in the palm of your hand
- Jan 12, 2023
- 2 min read

My method of teaching starts with basic building blocks. The old saying goes "You have to learn to walk before you can run". Well the same applies to archery. You have to learn how to hold the bow before you can shoot it!
So what does that all really mean? Well put simply, the hand is the focal point of your shooting form. It is the primary connection point with the bow.
So how critical is it? A good grip can help you shoot 2" group at 20 yards, or a bad one can turn that same group into 20". In the end, it's all about accuracy. So lets get started.
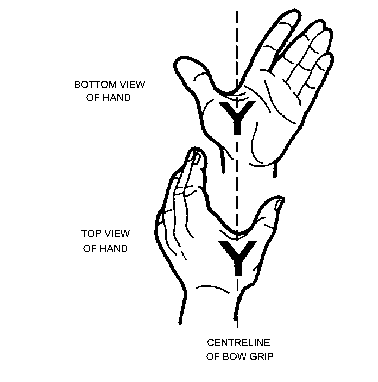
Hand placement is the first step in forming the base of your grip. In the illustration you will see the Y axis of your hand. Basically, its where split runs from the thumb pad to the rest of the hand. You need to place your bow along this line. Too far to one side or the other will result in torque which will play havoc with your shots.
Start by placing your hand on the riser along the Y axis. Make sure you don't cross this line on one side or the other. Also be sure to lay the hand flat on there. If your grip is raised, it will result in a very small pivot point and will make the bow harder to aim and steady.
Now when aiming you just apply pressure to that line only. Keeping the entire hand relaxed. This can be hard for some beginners to understand. But i'll put it like this. Your hand is just a a part of the machine that is your bow. Like any other machine, if one part becomes unbalanced, the rest will follow. So by placing your hand along the center of that line, you build the first part of your shooting machine.
Now, the most common thing i see is people grabbing the bow. And that is problem one. If you wrap your hand around the bow and apply what we all "the vulcan death grip" then it will only result in torque. So by just pushing instead of grabbing, it takes that torque out of the scenario.
Next, place your index and middle finger on the front of the riser. This will provide you with some somewhere to rest the front of your hand. But by placing only your index and middle finger there, it will force you to curl your other fingers and stop the left side of your hand from collapsing on the riser. And what does that do? It prevents torque.
If you apply pressure anywhere outside of the Y axis you are going to see shots go wide left or right. If you apply uneven pressure to the Y axis, you will see high and low shots. So even pressure distributed along the Y axis will form the base of your shot and get you going in the right direction.
In our next article we'll cover building the back end of your shooting form, the draw hand.


Comments